-
![]()
Joey Albert
Joey has been involved with tech ever since she joined the EaseUS editor team in March 2011 and now she is a senior website editor. She is good at solving various issues, such as video downloading and recording.…Read full bio -
![]()
Alin
Alin is a sophisticated editor for EaseUS in tech blog writing. She is proficient in writing articles related to screen recording, voice changing, and PDF file editing. She also wrote blogs about data recovery, disk partitioning, data backup, etc.…Read full bio -
![]()
Gorilla
Gorilla joined EaseUS in 2022. As a smartphone lover, she stays on top of Android unlocking skills and iOS troubleshooting tips. In addition, she also devotes herself to data recovery and transfer issues.…Read full bio -
![]()
Rel
Rel has always maintained a strong curiosity about the computer field and is committed to the research of the most efficient and practical computer problem solutions.…Read full bio -
![]()
Dawn Tang
Dawn Tang is a seasoned professional with a year-long record of crafting informative Backup & Recovery articles. Currently, she's channeling her expertise into the world of video editing software, embodying adaptability and a passion for mastering new digital domains.…Read full bio -
![]()
Sasha
Sasha is a girl who enjoys researching various electronic products and is dedicated to helping readers solve a wide range of technology-related issues. On EaseUS, she excels at providing readers with concise solutions in audio and video editing.…Read full bio
Page Table of Contents

Jane Zhou
Updated on Jun 16, 2026
0 Views |
0 min read
Bad audio can ruin a stream faster than anything else. Viewers might tolerate average video quality, but they won't stay if your voice has echo, background noise, sudden volume spikes, or noticeable delay. In most cases, the issue isn't your microphone, but it's how OBS is configured or how audio is being processed through your setup. This guide will walk you through everything you need to fix and optimize your OBS audio settings for streaming.
Before we go step by step, here's a quick reference cheat sheet to help you get the basic settings right immediately.
Quick Reference: Recommended OBS Audio Settings
| Features | Recommended Setting | Why it matters |
| Sample Rate | 48 kHz | Prevents distortion and sync issues |
| Channels | Stereo (or Force Mono) | Keeps voice natural and centered |
| Audio Bitrate | 128–160 kbps | Balanced quality for streaming platforms |
Why Your OBS Audio Sounds Bad When Streaming
If your stream audio sounds amateur, you don't necessarily need a $400 microphone. In OBS, bad mic quality usually boils down to three main culprits:
- Hardware & Environment: Cheap microphones or uncarpeted rooms easily pick up background hiss, AC hum, and mechanical keyboard clicks.
- Raw Default Settings: OBS defaults are completely unoptimized. Without proper gain staging, your voice will sound muffled, too quiet, or constantly "clip" (distort) when you laugh or yell.
- System Overload: Running demanding games, Discord, and OBS simultaneously can strain your CPU, leading to audio stuttering, crackling, or video-audio desync.
Knowing these causes, you can now choose the best way to fix them.
2 Ways to Configure OBS Audio Settings for Streaming
If your OBS audio doesn't sound right, there are only two real ways to fix it. You can either adjust everything manually inside OBS, or use an AI-powered tool that handles most of the work for you automatically. Both methods can improve your stream audio quality, but they differ in time, effort, and control.
Route 1. The One-Click AI Solution
If you want the fastest way to fix bad OBS audio and instantly upgrade your voice, the simplest option is to use a real-time AI voice changer like VoiceWave. Instead of spending time adjusting OBS filters, fixing noise issues, or trying to balance audio levels manually, VoiceWave lets you completely transform and enhance your voice in real time while streaming.
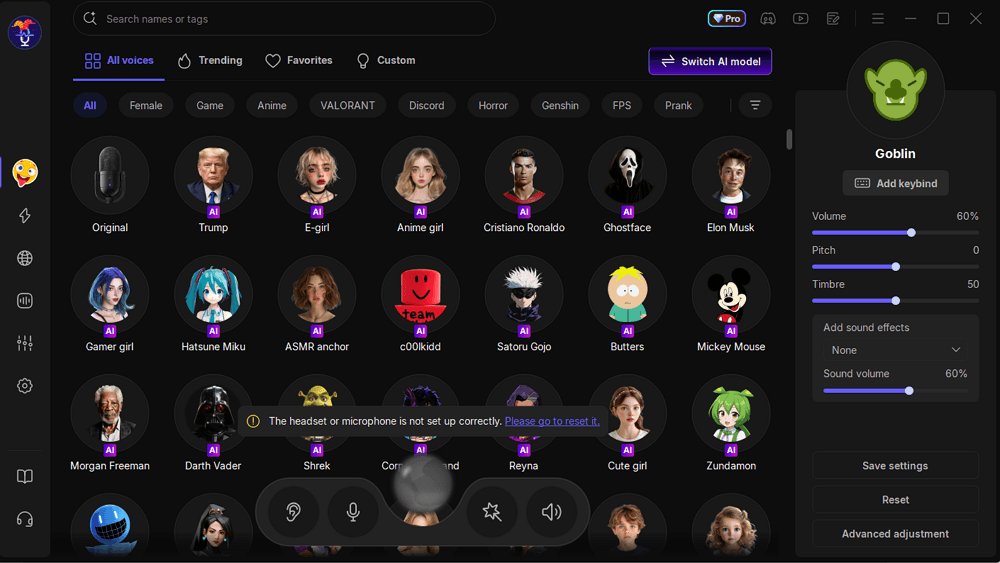
It can help you:
- Remove background noise automatically
- Improve voice clarity and richness
- Change your voice with different effects or styles (real-time voice changing)
- Balance audio levels without manual OBS tuning
This is especially useful for streamers who want not only cleaner audio but also a more engaging or entertaining voice during live content. Once enabled, simply set VoiceWave as your microphone input in OBS, and your upgraded voice will be applied instantly—no complex setup required.
Route 2. The Manual Route via OBS Built-In Settings
If you prefer full control or don't want to use external tools, OBS gives you everything you need to fix audio manually. However, this method requires more time and setup. You'll need to:
- Configure your microphone input correctly
- Add and adjust audio filters step by step
- Balance volume levels inside the OBS mixer
- Test and fine-tune settings repeatedly
This approach is better for users who want precise control over how their voice sounds or who are comfortable working with audio settings.
Next, we'll go through the exact OBS settings you need to get clean and stable audio as a baseline.
Essential OBS Audio Settings for Streaming (The Baseline)
Before using advanced filters or the AI OBS voice changer, make sure your basic OBS audio settings are correctly configured. These are the foundations of clean and stable stream audio.
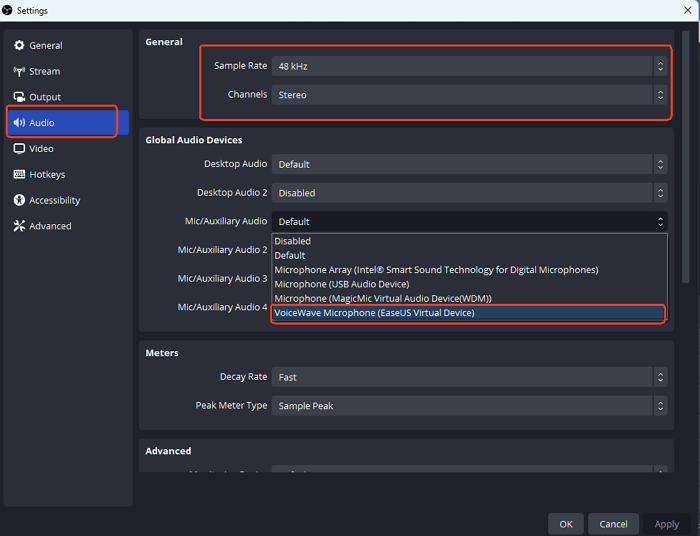
#1. Sample Rate (48 kHz)
Set OBS to 48 kHz to ensure stable audio and avoid sync issues.
#2. Stereo vs Mono
- Mono: recommended for most microphone-only setups (clearer voice focus)
- Stereo: better if you mix multiple audio sources
#3. Audio Bitrate (128–160 kbps)
This is the optimal range for streaming—clear voice quality without wasting bandwidth.
#4. Microphone Input
Always select your actual microphone or virtual input device (e.g., VoiceWave if used) and disable unused sources to avoid echo or overlap.
Once this is set, you can move on to advanced filters or use AI tools to further enhance your stream audio.
Advanced OBS Audio Settings for Streaming
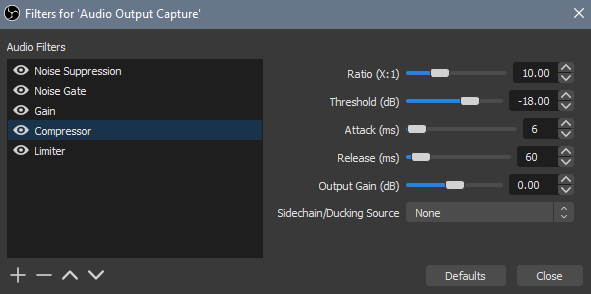
If you prefer the manual route, you must configure OBS's internal filters to handle live volume spikes and room noise. Click the three dots next to your mic in the Audio Mixer and select Filters.
OBS processes filters from top to bottom. If you arrange them incorrectly, you will inadvertently amplify your background noise rather than remove it.
Your filter stack must strictly follow this sequence:
- Step 1. Use Noise Suppression (Cleans raw background hiss and AC hum)
- Step 2. Add a Noise Gate (Mutes the mic when you aren't talking to cut out keyboard clicks)
- Step 3. Configure a Compressor (Balances volume so you don't deafen viewers when you yell)
- Step 4. Apply a Limiter (The final safety net set to -2dB to prevent audio distortion)
Upgrade Your Stream with AI Audio (The VoiceWave Shortcut)
If you don't want to waste hours guessing decibel sliders and testing manual filters, using a real-time AI sound engine like VoiceWave is the ultimate shortcut. Instead of stacking static filters inside OBS, VoiceWave optimizes your microphone externally before the audio even reaches your stream.
Step 1: Set Up Your Devices
- First, open VoiceWave and ensure your actual hardware microphone is selected as the input device inside the software.
- Next, open OBS and go to: Settings > Audio.
- Under Global Audio Devices, set Mic/Auxiliary Audio to VoiceWave Virtual Microphone.
Note: Disable all other microphone inputs to avoid horrible audio echo.
Step 2: Apply Your Voice Effect
Open VoiceWave and choose your preferred voice filter or professional vocal enhancement. The software processes everything automatically in real time.
Step 3: Start Streaming
OBS will now automatically capture the clean, optimized AI voice signal. You don't need to add any internal OBS filters. That's it. Your AI-enhanced voice is locked in and ready for your live stream.
Final Words
Achieving professional stream audio comes down to two choices: control or convenience.
- If you want complete control and don't mind constant testing, calibrating your OBS audio settings and filters manually will give you a solid, clean baseline.
- However, if you want to skip the setup headache, instantly eliminate background noise, and give your microphone a warm, broadcast-ready tone, downloading an AI tool like VoiceWave is the ultimate shortcut to perfect stream audio.
FAQs
1. What are the best OBS audio settings for streaming?
The best baseline settings are 48 kHz sample rate, stereo or mono depending on your setup, and 128–160 kbps bitrate. These settings provide stable, clear audio for most streaming platforms.
2. Why does my OBS audio sound bad even with a good mic?
Because most issues come from configuration, not the microphone itself. Incorrect filters, wrong input selection, or background noise can all affect your audio quality in OBS.
3. Do I need OBS filters if I use a voice changer like VoiceWave?
Not necessarily. Tools like VoiceWave can handle noise reduction and voice enhancement in real time, reducing or even eliminating the need for manual OBS filters.
4. Can I use a voice changer while streaming on OBS?
Yes. Voice changers like VoiceWave work by creating a virtual microphone that you can select directly in OBS as your audio input source.