-
![]()
Joey Albert
Joey has been involved with tech ever since she joined the EaseUS editor team in March 2011 and now she is a senior website editor. She is good at solving various issues, such as video downloading and recording.…Read full bio -
![]()
Alin
Alin is a sophisticated editor for EaseUS in tech blog writing. She is proficient in writing articles related to screen recording, voice changing, and PDF file editing. She also wrote blogs about data recovery, disk partitioning, data backup, etc.…Read full bio -
![]()
Gorilla
Gorilla joined EaseUS in 2022. As a smartphone lover, she stays on top of Android unlocking skills and iOS troubleshooting tips. In addition, she also devotes herself to data recovery and transfer issues.…Read full bio -
![]()
Rel
Rel has always maintained a strong curiosity about the computer field and is committed to the research of the most efficient and practical computer problem solutions.…Read full bio -
![]()
Dawn Tang
Dawn Tang is a seasoned professional with a year-long record of crafting informative Backup & Recovery articles. Currently, she's channeling her expertise into the world of video editing software, embodying adaptability and a passion for mastering new digital domains.…Read full bio -
![]()
Sasha
Sasha is a girl who enjoys researching various electronic products and is dedicated to helping readers solve a wide range of technology-related issues. On EaseUS, she excels at providing readers with concise solutions in audio and video editing.…Read full bio
Page Table of Contents
Myra
Updated on Jun 17, 2026
0 Views |
0 min read
We have all been there: you are in the middle of an important presentation or a crucial client pitch, and your voice suddenly cuts out, turns into a glitchy robotic stutter, or creates a piercing background echo. Nothing derails professional credibility faster than spending the first ten minutes of an online meeting asking, "Can everyone hear me now?"
When your sound is muffled or disrupted by constant background noise, it causes immediate meeting fatigue and leads to missed information, frustrated colleagues, and ruined deals. If you are struggling with poor microphone performance or chaotic audio environments, this comprehensive guide will show you exactly how to improve Zoom audio quality by tweaking hidden software settings, upgrading your hardware, and optimizing your meeting space.
Understanding the Root Causes of Poor Zoom Audio
Before diving into the fixes, it is essential to understand why your microphone sound degrades during an online call. Excellent sound in a physical room does not automatically translate to a high-quality digital stream. Generally, poor Zoom audio stems from three main culprits:
- Audio Compression: To maintain a smooth, lag-free connection for millions of users simultaneously, Zoom's default settings heavily compress your audio data. This data-squeezing often strips away the natural depth of your voice, making it sound thin, metallic, or muffled.
- Hardware Bottlenecks: Built-in laptop microphones are physically tiny and usually located right next to the internal cooling fans. As a result, they naturally pick up annoying whirring noises and keyboard clicks rather than focusing on your vocal cords.
- Poor Room Acoustics: Smooth, hard surfaces like bare walls, hardwood floors, and glass windows act as acoustic mirrors. When you speak, your voice bounces off these objects repeatedly, creating a chaotic echo effect that makes you sound like you are speaking from inside a cave.
Step-by-Step Guide to Enhancing Your Zoom Sound
Optimizing your online audio requires a mix of deliberate software tweaks and strategic hardware adjustments. By systematically working through the following steps, you can bypass the platforms' default limitations and ensure your voice sounds clear and authoritative during every meeting.
Configure Zoom's Noise Suppression Settings
Zoom features a highly capable built-in noise suppression tool designed to eliminate distractions such as keyboard clacking, ceiling fans, and distant traffic. However, its default "Auto" setting often struggles to distinguish between background noise and your actual voice, resulting in a muffled or cut-off sound.
To take control of your audio, manually adjust your suppression levels using these steps:
Step 1. Open your Zoom desktop client and click the Gear icon in the top-right corner.
Step 2. Select the Audio tab from the left-hand navigation menu.
Step 3. Locate the Audio Profile section on the right side of the screen.
Step 4. Under Zoom background noise suppression, change the selection from Auto to your desired level (Low, Medium, or High).
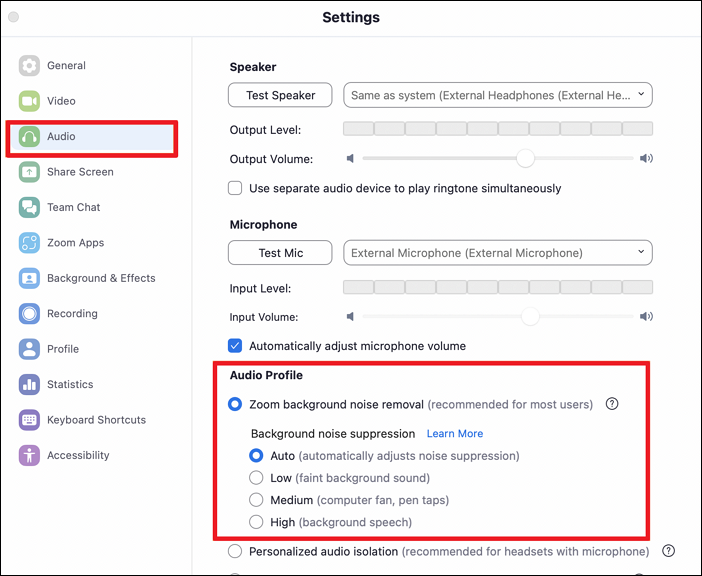
Pro Tip: For standard home offices, manually setting this to Low or Medium is usually ideal, as it filters out faint ambient hums without compressing your natural vocal tone. Only switch to High if you are dealing with aggressive noise, such as ongoing construction or barking pets. Keep in mind that the High setting consumes more computer CPU power, so make sure your laptop is plugged in for optimal performance.
Manage Echo Cancellation and Use Headphones
An echo is one of the most frustrating audio issues during a virtual call. This happens when the sound from your computer speakers travels through the air and gets sucked right back into your open microphone, creating a continuous, irritating feedback loop. While Zoom applies automated echo cancellation by default, the digital processing can sometimes cause your voice to clip or sound distant as it fights to suppress the loop.
The absolute best way to manage echo cancellation is to break the physical audio loop entirely by wearing headphones. When you use headphones or earbuds, your speakers are sealed inside your ears, so your microphone captures only the direct acoustic energy of your voice. If you must use open speakers, ensure you do not place your external microphone directly in front of them, and keep your overall output volume at a moderate level.
Upgrade to an External USB Microphone
If you want to achieve professional, podcast-quality sound, relying on the pinhole microphone built into your laptop chassis will always hold you back. These factory microphones are designed to capture a wide field of sound, which means they naturally suck in room reflections and the whirring noise of your computer's internal cooling fan.
Upgrading to a dedicated external USB microphone makes a massive, immediate difference. Look for a condenser or dynamic microphone that features a cardioid polar pattern. A cardioid pattern is heart-shaped, meaning the microphone is highly sensitive to sounds coming directly from the front (your mouth) while completely rejecting sounds from the back and sides. Simply plugging a USB microphone into your setup instantly provides a warmer, richer, and more professional vocal presence.
Manually Adjust the Microphone Input Volume
Most users leave Zoom's "Automatically adjust microphone volume" box checked, assuming the software knows best. In reality, this automated gain control constantly shifts your input levels up and down based on how loud you speak. If you pause to think, Zoom will automatically crank up your microphone sensitivity, which accidentally amplifies the background hiss of the room. When you start speaking again, your first few words will blast the ears of your listeners before the software can scale back down.
You can lock in a consistent and reliable volume level by following these steps:
Step 1. Navigate to Settings > Audio within your Zoom desktop application.
Step 2. Under the Microphone section, uncheck the box labeled Automatically adjust microphone volume.
Step 3. Speak into your microphone at your normal presentation volume and watch the shifting Input Level meter.
Step 4. Manually drag the Input Volume slider left or right until your loudest spoken words consistently land comfortably within the green zone (ideally around 60% to 75% of the total bar).
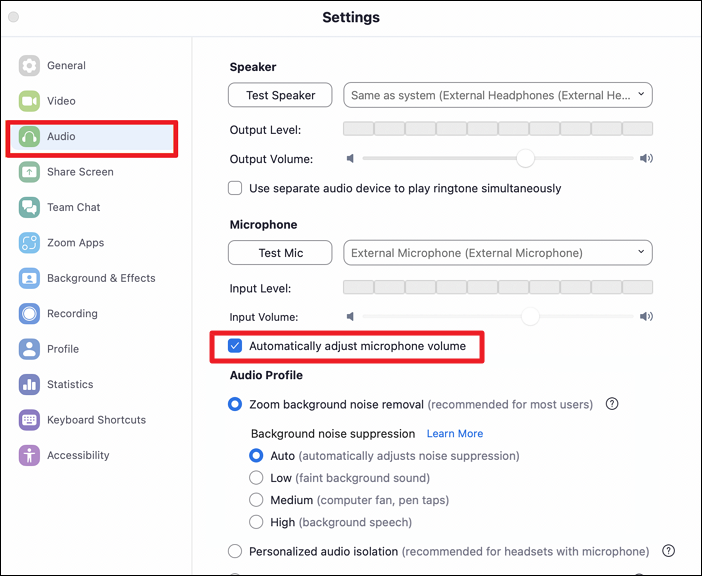
By taking these manual steps, you prevent sudden volume spikes, stop digital clipping, and ensure a steady, comfortable listening experience for your audience throughout the entire call.
Turn on High-Fidelity Audio Mode for Special Scenarios
While Zoom's standard algorithms are carefully optimized for speech, they treat music, instruments, or professional voiceover work as unwanted noise and aggressively filter them out. If you are a music teacher, a podcaster recording an episode, or someone who needs to share high-quality media sound over a call, Zoom's standard compression will make your audio sound crushed and heavily distorted.
To bypass this aggressive filtering and unlock studio-quality sound, you can enable Zoom's native High-Fidelity mode:
Step 1. Click the gear icon in your Zoom desktop client and select the Audio tab.
Step 2. Under the Audio Profile section, check the box next to "Original sound for musicians."
Step 3. Under the new options that appear below, check "High-fidelity music mode."
Step 4. During your live meeting, look for the "Original Sound for Musicians: On/Off" toggle button in the top-left corner of your screen, and ensure it is switched to On.
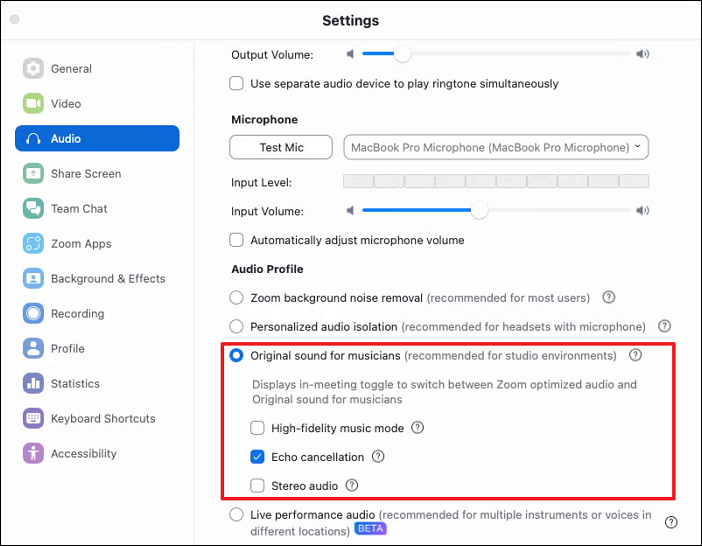
Pro Tip: Enabling this feature bypasses Zoom's echo cancellation and background suppression algorithms. Therefore, you have to use a pair of headphones and a high-quality external microphone when this mode is active to prevent creating a massive feedback loop for other participants.
Secure Reliable Bandwidth via an Ethernet Connection
No matter how perfect your software settings or microphone hardware are, your audio quality will instantly collapse if your internet connection drops packets. When your bandwidth fluctuates on a Wi-Fi connection, Zoom prioritizes video streaming over audio continuity. This results in the frustrating robotic stutter or complete audio dropouts where you skip words mid-sentence, forcing other meeting attendees to constantly ask you to repeat yourself.
To secure a completely stable and unshakeable audio stream, implement these connection steps:
Step 1. Ditch the Wi-Fi and plug a physical Cat6 Ethernet cable directly from your internet router into your computer.
Step 2. Before your important presentation, close all background applications on your PC that might be consuming massive bandwidth, such as cloud backups, game launchers, or open browser tabs streaming 4K video.
Step 3. Instruct other members of your household to pause heavy internet use, such as large file downloads or online gaming, during your critical meeting.
Switching to a wired connection slashes your latency (ping) and eliminates packet loss, ensuring that your audio data always arrives smoothly, continuously, and in perfect real-time synchronization with your video.
Optimize Room Acoustics with Simple Adjustments
You can purchase an expensive microphone, but if your room lacks proper acoustic treatment, your audio will still sound hollow and distant. Large rooms with bare walls, exposed glass windows, and hardwood floors act as acoustic mirrors. When you speak, your vocal sound waves repeatedly bounce off these hard surfaces, creating a chaotic echo that makes you sound like you are calling from inside a cave or a bathroom.
Fortunately, you do not need to install professional acoustic foam to fix this. You can dramatically improve your room acoustics with a few zero-cost adjustments:
- Close all windows and pull shut any thick curtains or blinds to block outside noise and absorb high-frequency reflections from inside.
- Throw a large area rug or carpet on hardwood or tile floors directly under your desk.
- Place a few soft, dense items, like a plush sofa, open fabric bookshelves, or even decorative pillows, behind your setup or against bare walls to break up sound reflections.
By introducing these soft materials, you successfully absorb the stray sound waves before they can bounce back into your microphone, giving your voice a warmer, richer, and more intimate tone.
Use Third-Party Software for Advanced Noise Control
While fine-tuning Zoom's internal settings provides an excellent baseline, you can also achieve audio clarity by adding a dedicated desktop audio processing application to your setup. EaseUS VoiceWave is a real-time voice changer that also provides powerful microphone denoising capabilities.
Once you activate the noise reduction enhancement effect, the software instantly reduces distracting ambient sounds, heavy keyboard clicks, and background chatter before the audio data even reaches your meeting. This creates a clean, distraction-free input stream that integrates seamlessly with your conference software.
To enhance your meeting audio using EaseUS VoiceWave, follow these steps:
Step 1. Download and open EaseUS VoiceWave on your desktop before launching your call.
Step 2. Select your microphone in the application and enable the Microphone Denoise function.
Step 3. Open your Zoom client, navigate to Settings > Audio, and locate the Microphone dropdown menu.
Step 4. Select the virtual driver created by the software labeled as VoiceWave Microphone as your primary input source.
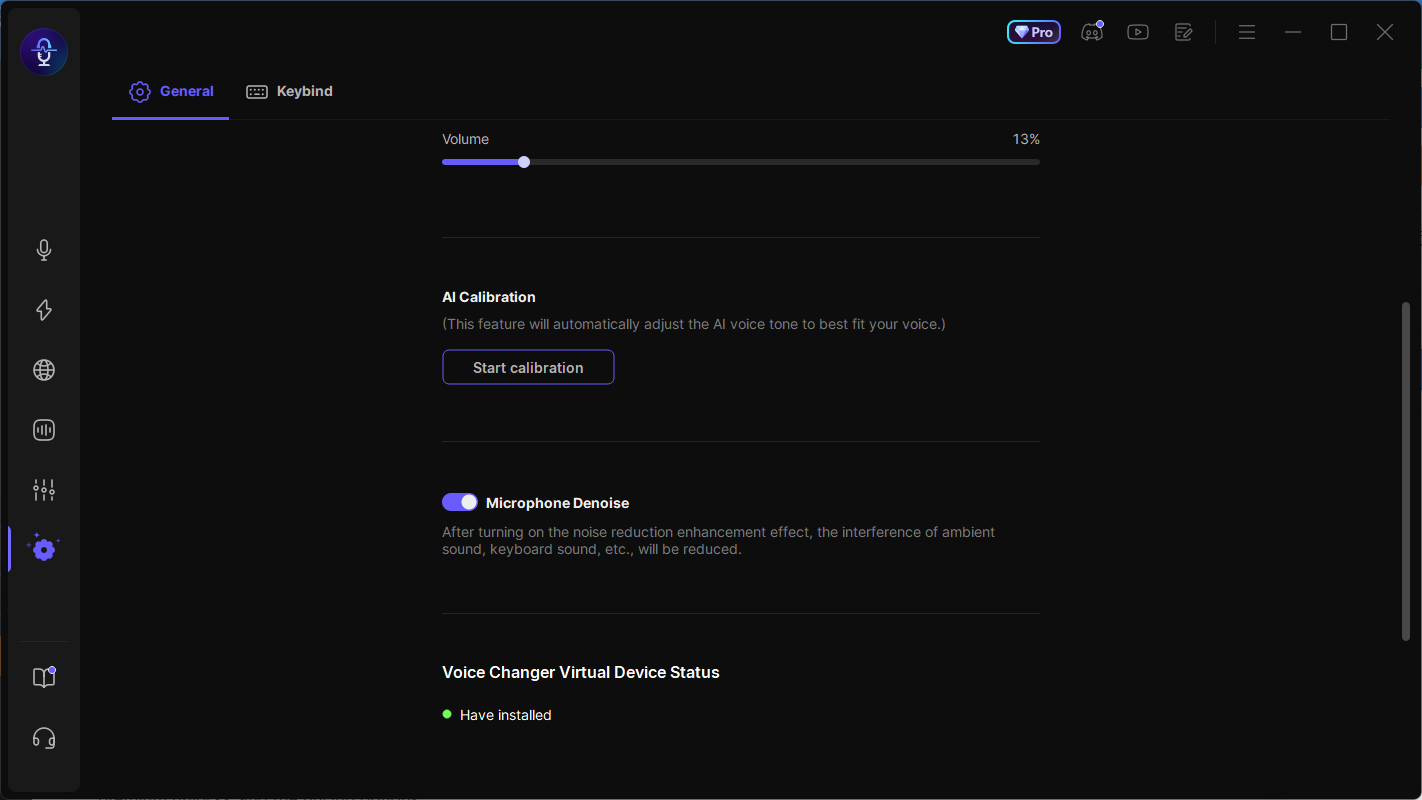
Pro Tip: Because EaseUS VoiceWave handles the background noise cancellation at the system level, you can set Zoom's built-in noise suppression to "Low." This combined setup gives you the ultimate best of both worlds: a completely quiet background environment without the metallic, crushed audio distortion that often comes with Zoom's native maximum settings.
Conclusion
Achieving studio-grade sound on your virtual calls is not a matter of luck; it is a direct result of deliberate optimization. As we have explored, mastering your audio experience involves configuring hidden software parameters, making minor acoustic changes to your physical workspace, and using dedicated hardware.
FAQ
1. Why does my Zoom audio sound muffled or underwater?
Your Zoom audio usually sounds muffled or "underwater" due to aggressive software compression or to a built-in microphone that sits too far from your face. To fix this, change your Zoom background noise suppression to Low and speak closer to an external microphone to help the algorithms capture the full, natural frequency of your voice.
2. Why do I sound like a robot on Zoom?
A "robotic" stuttering voice is almost always caused by network packet loss or high latency on a Wi-Fi connection. When your internet bandwidth fluctuates, Zoom struggles to piece your voice data back together in real-time. Switching from wireless Wi-Fi to a wired connection is the easiest way to cure robotic audio immediately.
3. Is a USB headset better than a laptop microphone for Zoom?
Yes, a dedicated USB headset is significantly better than any built-in laptop microphone. Headset microphones are physically positioned much closer to your mouth, allowing them to capture direct acoustic energy while automatically rejecting ambient room noise and the whirring of internal computer fans.
4. How can I test my Zoom audio quality before a live meeting starts?
The easiest way to test your sound is by using Zoom’s built-in diagnostic tool. Open your desktop client, click on Settings > Audio, and click the Test Mic button. Speak a short sentence, and the software will immediately play it back to you. This allows you to listen to exactly what your colleagues will hear and adjust your input volume or background noise levels before the call begins.
5. Why does Zoom keep automatically muting my microphone?
If Zoom is constantly muting your microphone without your permission, it is usually due to conflicting keyboard shortcuts or interference from third-party software. Check your settings under Settings > Keyboard Shortcuts to see if your mute function is mapped to a key you press frequently. Additionally, check if your external microphone or headset has a physical mute button that is accidentally being triggered.
6. Does sharing my screen lower my Zoom audio quality?
Yes, sharing your screen can indirectly degrade your audio quality if your computer or internet connection is pushed to its limits. Screen sharing increases both CPU usage and network bandwidth consumption. If you notice your audio stuttering while presenting a slideshow, try closing all other unnecessary background apps and software to free up system processing power for your audio stream.